MyMuse Options
Global default settings for menu types which display products in different layouts and formats.
How To Access
To access this screen:
- Navigate to the MyMuse screen, then
- Click the Options toolbar button. This opens the MyMuse Component Options screen in a modal window.
Description
This screen is where you can set global defaults for menu items that display products. These default values will be used when you select "Use Global" for an option in a products menu item. For example, if you normally want to show the Create Date for an Product in your Products menu items, then set that option to "Show" here and it will be the default value. You do not need to set any of these options. You can adjust them them by menu.
Product options are divided into eight groups as follows. Each controls the appearance of the listed type of layout.
- Products: Products in Single Product or blog layouts.
- Categories: Products Categories layout.
- Category Pages: Single Category layouts -- for example, when you click on a category to view the Products it contains.
- Blog/Column Layout: Category Blog Layout.
- List Layouts: Category List Layout.
- Shared Options: Shared options for list, blog, and featured layouts.
- Integration: Feed Link and Read More options.
- Live Updates: Enter your username and password for the MyMuse site to enable updates.
- Permissions: ALC permissions for actions on Products.
Screenshot
Toolbar
At the top left of the Options screen you will see the toolbar.

The functions are:
- Save. Saves any changed options and keeps the window open. Use this, for example, to see the effect of Permissions changes you have made.
- Save & Close. Saves any changed options and closes the screen.
- Cancel. Closes the screen without saving any changes.
Form Fields
Products Options
Product Options control how an Product will show in a Single Product menu item or when coming from a menu of type Categories or Category.
If a menu item exists for the product, then that menu's options will take precedance.

- Show Title: (Hide/Show). Hide or Show the Product title.
- Show Intro Text: (Hide/Show) If set to Show, the Intro text will be displayed near the top.
- Show Product Image: (Hide/Show) If set to Show, the product detail image will be displayed near the top.
- Product Image Height: Force the image height to be this, otherwise it is whatever height was uploaded.
- Show Quantity: (Hide/Show) Should the cart table show the quantity, allowing the customer to change the quantity.
- Show Fulltext: (Hide/Show) If set to Show, the full text will be displayed below the shopping cart options.
- Show Recording Details: (Hide/Show). show any fields with values from the group Recording Details: Release Date, Full time, Country, Publisher, Producer, Studio.
- Show Tracks: (Hide/Show) If set to Show, the tracks table will be shown. It is possible your preview player will include the tracks.
- Player Type:(One player for each, One Player for All, Player with Playlist) It is possible that a custom player will not offer all these options.
- One Player for each will show the player beside each track.
- One Player for all will show the player at the top of the tracks table and each track will have a "Play" button.
- Player with Playlist will show one player with a list of clickable names in a playlist below.
- Player Width: Set the player width. Some have default widths. Not all players respect this.
- Player Height: Set the player height. Some have default heights. Not all plyers respect this.
- Show Select Column: (Hide/Show) If set to Show, the cart tables will start with a checkbox for each item.
- Show File Size: (Hide/Show) If set to Show, the cart tables will include the file size of the downloadable product.
- Show File Time: (Hide/Show) If set to Show, the cart tables will include the file time of the downloadable product.
- Show Cost Column: (Hide/Show) If set to Show, the cart tables will include the cost of the product.
- Show Preview Column: (Hide/Show) If set to Show, the cart tables will include the preview of the product.
- Show Add to Cart Button: (Hide/Show) If set to Show, the cart tables will be followed by the "Add Selections to Cart" button.
- Show Items in a select Dropdown: (Yes/No) If set to Yes, items will be displayed in a dropdown.
All items with the same name will be in one dropdown. - Show Category: (Hide/Show). Hide or Show the Product's category title.
- Link Category: (No/Yes). If the category title is shown, whether or not to show it as a link to a Single Category menu item for the category. Note that you can set this to be either a blog or list layout with the "Choose a layout" option in the Category Options.
- Show Parent Category: (Hide/Show). Hide or Show the title of the parent category of the Product's category. This is provided for backward compatibility to the role of Sections in Joomla version 1.5.
- Link Parent: (No/Yes). If the parent category is shown, whether or not to show it as a link to a Single Category menu item for the category. Note that you can set this to be either a blog or list layout with the "Choose a layout" option in the Category Options.
- Show Author: (Hide/Show). Hide or Show the Product's author.
- Link Author: (No/Yes). If the author is shown, whether or not to show it as a link to the Joomla user. Note that this will only show as a link if there is a Contact associated with this user. Also, a link will not show if there is an Author Alias value for the Product.
- Show Create Date: (Hide/Show). Hide or show the Product's create date.
- Show Modify Date: (Hide/Show). Hide or show the date the Product was last modified.
- Show Publish Date: (Hide/Show). Hide or show the Product's published date.
- Show Navigation: (Hide/Show). Hide or Show a navigation link (e.g., Next, Previous) between Products.
- Show Voting: (Hide/Show). Hide or Show a voting button for the Product. This allows users to vote for an Product.
- Show "Read More": (Hide/Show) Whether or not to show the "Read More..." link to link from the part of the Product before the "Read More..." break to the rest of the Product.
- Show Title with Read More: (Hide/Show) Whether or not to show the Product title as part of the Read More link. If set to Show, the Read More link will be in the format "Read More: <Product title>". If set to Hide, the Read More link will be "Read more...".
- Show Icons: (Hide/Show). Hide or Show icons for the print and email buttons. If Show, and if the print or email icons are set to show, these will show as icons instead of text links.
- Show Print Icon: (Hide/Show). Hide or Show a button or link to allow printing the Product.
- Show Email Icon: (Hide/Show). Hide or Show a button or link to allow emailing the Product.
- Show Hits: (Hide/Show). Hide or Show the number of times the Product has been viewed (called hits).
- Show Unauthorised Links: (Hide/Show). If set to Show, the Intro Text for restricted Products will show. Clicking on the "Read More" link will require users to log in to view the full Product content. If set to Hide, Products that the user is not authorised to view (based on the viewing access level for the Product) will not show.
Categories Options
Categories Options control the display of the List All Categories menu item.
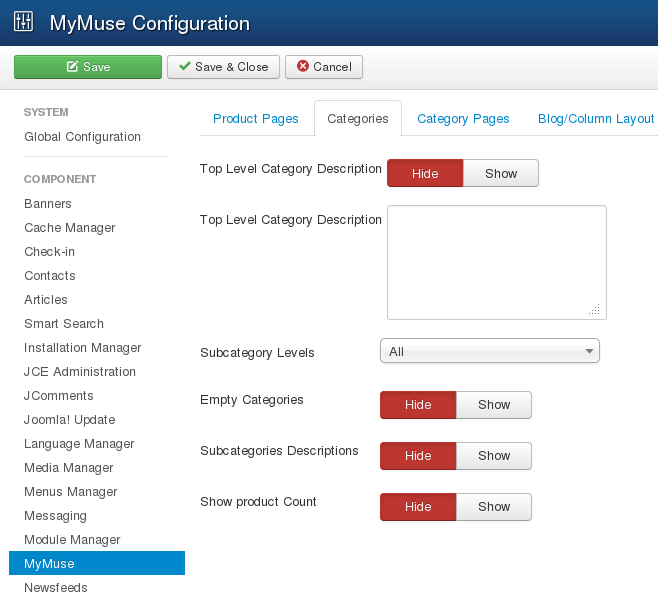
- Top Level Category Description: (Hide/Show). Hide or Show the description of the top-level category.
- Top Level Category Description: Text to show.
- Subcategory Levels:. (All/1-5). How many levels in the hierarchy to show.
- Empty Categories: (Hide/Show). Hide or Show categories that contain no Products and no subcategories.
- Subcategories Descriptions: (Hide/Show). Hide or Show the description of each subcategory.
- Show Product Count: (Hide/Show). Hide or Show a count of the total number of Products in each category.
Category Pages Options
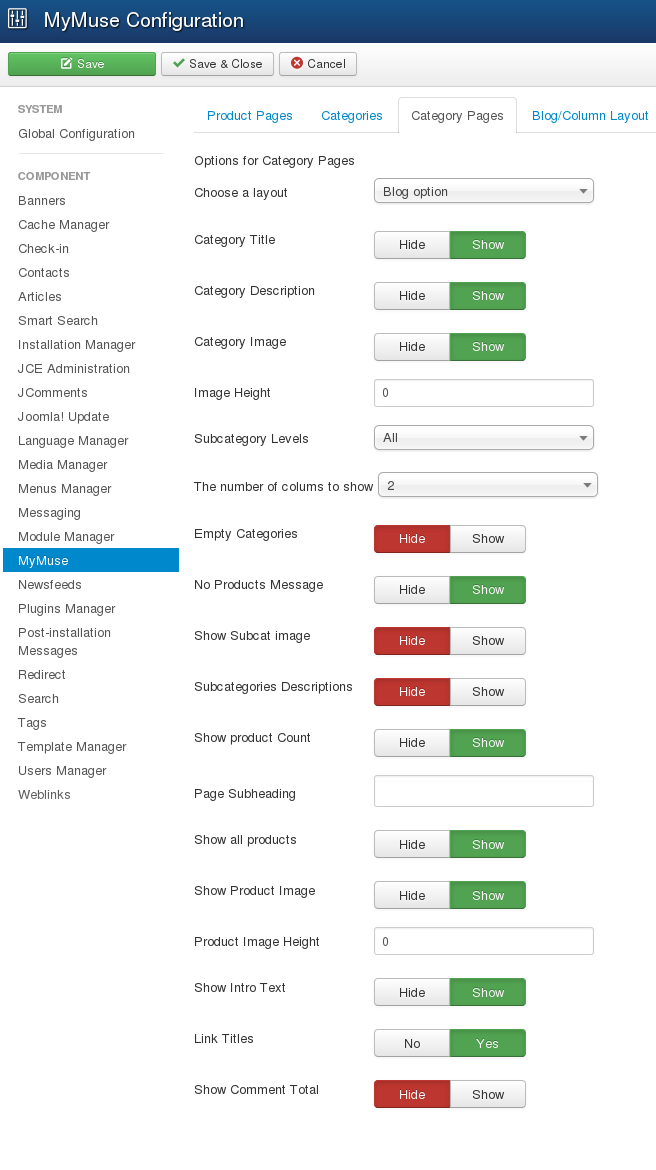
Category Options control how Products will show when you drill down to a Category to view its Products.
- Choose a layout: (Blog/List/user defined). This lets you select the default layout to show when you click on a product link in a Category page. If you create an alternative layout for a category layout, you may select that as the default.
- Category Title: (Hide/Show) Hide or Show the title of the category.
- Category Description: (Hide/Show) Hide or Show the description for the category.
- Category Image: (Hide/Show) Hide or Show the category image.
- Image height: Restrict the height of the category image.
- Subcategory Levels: (None/All/1-5). Categories in Joomla can be created in a hierarchy. This lets you control how many levels of subcategories to show when showing a category view.
- The number of columns to show: Present the subcateory list in this many columns.
- Empty Categories: (Hide/Show) Hide or Show categories that don't contain any Products or subcategories.
- No Products Message: (Hide/Show) If Show, and if Empty Categories is Show, a message "There are no Products in this category" will show if a category contains no Products.
- Show Subcat Image: (Hide/Show) Hide or Show the sub-category image.
- Subcategories Descriptions: (Hide/Show) Hide or Show the descriptions for subcategories that are shown.
- Show Product Count: (Hide/Show) Hide or Show a count of the total number of Products in each category.
- Page Subheading: Include a sub heading on the page.
- Show All Products: (Hide/Show) Show all products in the selected category.
- Show Product Image: (Hide/Show) Hide or Show the product image.
- Product Image Height: Force the product image height in the Category page. Only applicable when Show All Products is set to Show.
- Show Intro Text: (Hide/Show) Show intro text of the product with each listing on the Category page.
- Link titles: (Yes/No) If set to Yes, the Title of the product will have a link to the product detail page.
- Show Comment Total: (Hide/Show) If using Jcomments, show the total comments for each product.
Blog / Column / Featured Layout Options
These options control the layout of the Category Blog and Featured Products layouts.
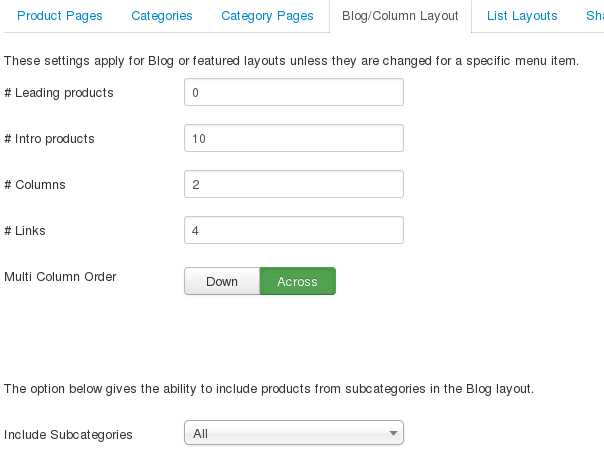
- # Leading Products: Number of Products to show using the full width of the main display area. "0" means that no Products will show when using the full width. If a Product has a "Read more..." break, only the part of the text before the break (the Intro text) will display.
- # Intro Products: Determines the number of Products to display after the leading Product. These Products will display in the number of columns set in the Columns parameter below. If an Product has a "Read more..." break, only the text before the break (Intro text) will display, followed by a "Read more..." link. The order order in which to display the Products is determined by the Category Order and Product Order parameters below.
- # Columns: The number of columns to use in the Intro Text area. This is normally between 1 and 3 (depending on the template you are using). If 1 is used, the Into Text Products will display using the full width of the display area, just like the Leading Products.
- # Links: The number of Links to display in the 'Links' area of the page. These links allow a User to link to additional Products, if there are more Products than can fit on the first page of the Blog Layout.
- Multi Column Order:In multi-column blog layouts, whether to order Products Down the columns or Across the columns.
- Down: Order Products going down the first column and then over to the next column, for example:
-
Product 1 1 (continued) Product 2 Product 4 Product 3 Product 5
-
-
- Across: Order Products going across the columns and then back to the first column, for example:
-
Product 1 1 (continued) Product 2 Product 3 Product 4 Product 5
-
- Include Subcategories: (None/All/1-5). If None, only Products from the current category will show. If 1-5, all
Products from the current category and subcategories up to and including that level will show. If All, all
Products from the current category and all subcategories will show.
List Layout Options
These options control the appearance of the Category List layout.
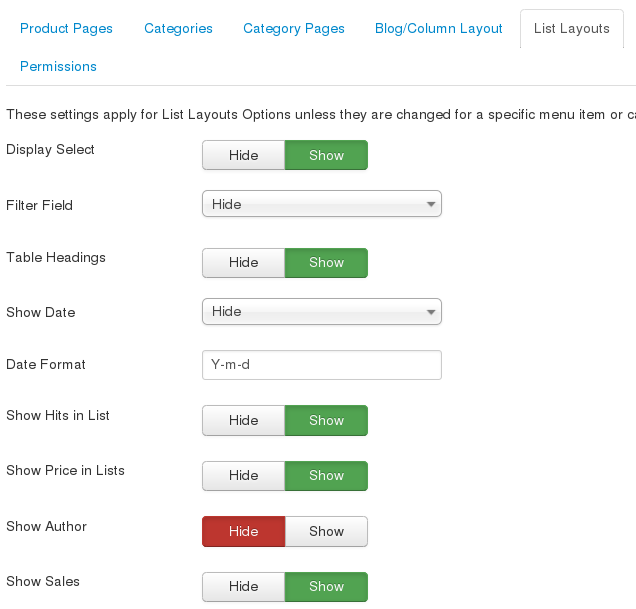
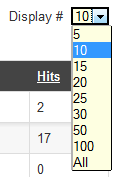
- Display Select.(Hide/Show) Whether to hide or show the Display # control that allows the user to select the number of items to show in the list. An example is shown below.
If there are more items than this number, you can use the page navigation buttons (Start, Prev, Next, End, and page numbers) to navigate between pages. Note that if you have a large number of items, it may be helpful to use the Filter options, located above the column headings, to limit which items display.
- Filter Field.The Filter Field creates a text field where a user can enter a field to be used to filter the Products shown in the list. An example of how this looks in the front-end layout is shown below.
- The possible options for this (in the back-end menu item edit) are shown below.
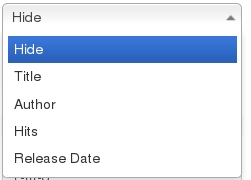
- Hide: Don't show a filter field.
- Title: Filter on Product title.
- Author: Filter on the author's name.
- Hits: Filter on the number of Product hits.
- Release Date: The release date of the albums
- Table Headings.(Hide/Show) Table Headings show a heading above the Product list, as shown below.
If set to Show, this heading will show about the list. Otherwise the list will show with no headings.

- Show Date.This option allows you to show a date in the list. The options are as follows.
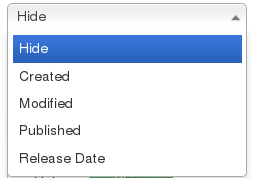
-
- Hide: Don't show any date.
- Created: Show the created date.
- Modified: Show the date of the last modification.
- Created: Show the start publishing date.
- Date Format: Optional format string to control the format of the date (if shown). If left blank, the date will use the DATE_FORMAT_LC1 format from the language file (for example, "D M Y" for "31 December 2012" or "m-d-y" for "12-31-12"). See PHP Date Documentation for more information.
- Show Hits in List: (Hide/Show) Whether to hide or show the number of hits for this item.
- Show Price in Lists: (Hide/Show) Whether to hide or show the price for this item.
- Show Author in List: (Hide/Show) Whether to hide or show the name of the author.
- Show Sales: (Hide/Show) Whether to hide or show the number of sales for this item.
These options are shared by a number of the Products menu item types.
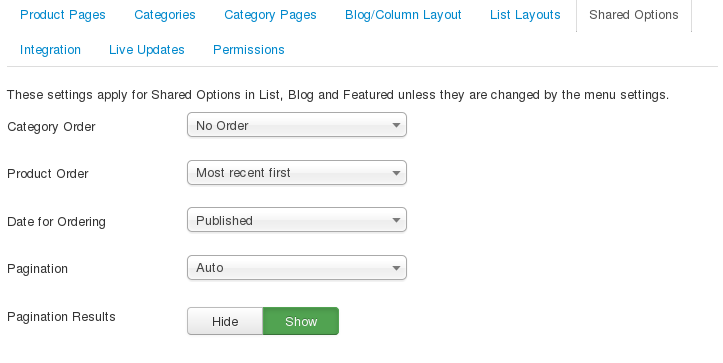
- Category Order.Order of Categories in this Layout. The following options are available.
- No Order: Products are ordered only by the Product Order, without regard to Category.
- Title Alphabetical: Categories are displayed in alphabetical order (A to Z)
- Title Reverse Alphabetical: Categories are displayed in reverse alphabetical order (Z to A)
- Category Manager Order: Categories are ordered according to the Order column entered in the Category Manager.
- Product Order.Order of Products in this Layout. The following options are available.
- Most recent first: Products are displayed starting with the most recent and ending with the oldest. This is based on the Product Made Date.
- Oldest first: Products are displayed starting with the oldest and ending with the most recent.
- Title Alphabetical: Products are displayed by Title in alphabetical order (A to Z)
- Title Reverse Alphabetical: Products are displayed by Title in reverse alphabetical order (Z to A)
- Author Alphabetical: Products are displayed by Author in alphabetical order (A to Z)
- Author Reverse Alphabetical: Products are displayed by Author in reverse alphabetical order (Z to A)
- Most Hits: Products are displayed by the number of hits, starting with the one with the most hits and ending with the one with the least hits
- Least Hits: Products are displayed by the number of hits, starting with the one with the least hits and ending with the one with the most hits
- Product Manager Ordering: Products are ordered according to the Order column entered in the Product Manager.
- Most Sales.
- Date for Ordering.The date used when Products are sorted by date. The following options are available.
- Created: Use the Product created date.
- Modified: Use the Product modified date.
- Published: Use the Product start publishing date.
- Release Date. The release date of the products.
- Pagination.Hide or Show Pagination support. Pagination provides page links at the bottom of the page that allow the User to navigate to additional pages. These are needed if the Products will not fit on one page. An example is shown below.
The following options are available.
- Auto: Pagination links shown if needed.
- Show: Pagination links shown if needed.
- Hide: Pagination links not shown. Note: In this case, Users will not be able to navigate to additional pages.
- Pagination Results. Hide or Show the current page number and total pages (e.g., "Page 1 of 2") at the bottom of each page.
Integration Options
These options control the display of news feeds. The View must have a view.feed.php file to provide the feed.

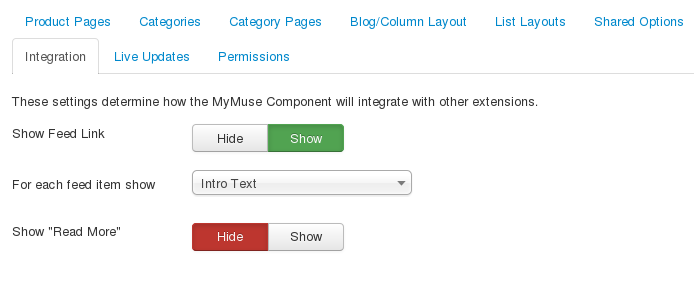
- Show Feed Link. (Hide/Show) Whether to Hide or Show a link to a news feed (RSS Feed). If set to Show, a Feed Link will show up as a feed icon in the address bar of most modern browsers).
- For each feed item show. (Intro Text/Full Text) If Intro Text, only the Product's intro text will show in the feed. Otherwise, the entire text of the Product will show.
- Show "Read More". (Hide/Show) Hide or Show a "Read more" link in the newsfeed.
Live Updates
Enter your username password from the MyMuse site to enable downloads of new versions. You can also log in to the site and download them directly.

- Username: Your username for your MyMuse subscription.
- Password: Your password for your MyMuse subscription.
Permissions. Only apply to back-end groups. MYMUSE DOES NOT ALLOW FRONT END EDITING AT THIS TIME
This section lets you set up the default ACL permissions for all Products in all categories. These permissions may be overridden for specific categories and for specific Products.
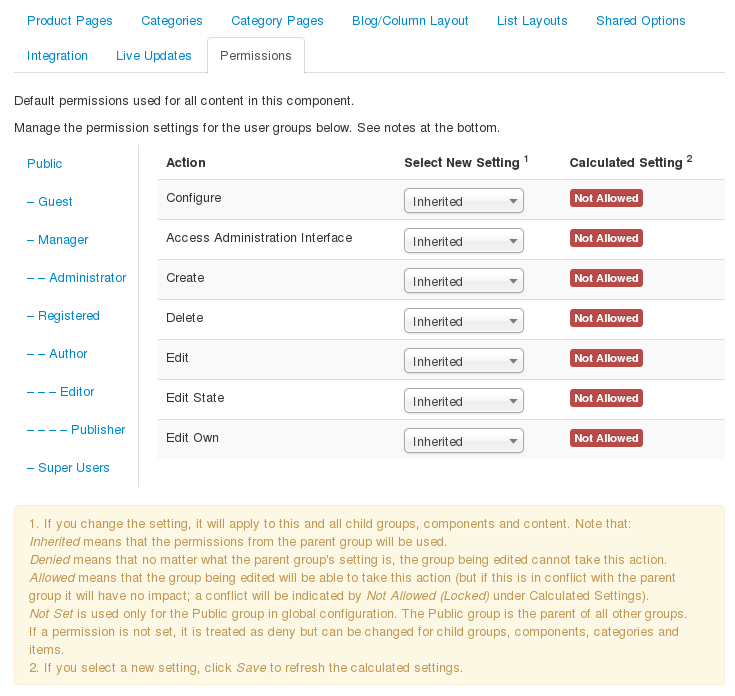
To change the permissions, do the following.
- Select the Group by clicking its title.
- Find the desired Action. Possible Actions are:
- Configure. Users can access this screen (Product Manager→Options).
- Access Administrative Interface. Users can access the Product Manager.
- Create. Users can create new Products.
- Delete. Users can delete Products.
- Edit. Users can edit the contents of Products.
- Edit State. User can change the published state and related information for Products.
- Edit Own. User can edit the content or published state for Products that this user created.
- Select the desired permission for the action you wish to change. Possible settings are:
- Inherited. Inherited for users in this Group from Global Configuration.
- Allowed. Allowed for users in this Group. Note that, if this action is Denied at one of the higher levels, the Allowed permission here will not take effect. A Denied setting cannot be overridden.
- Denied. Denied for users in this Group.
- Click Save. When the screen refreshes, the Calculated Setting column will show the effective permission for this Group and Action.
Quick Tips
- If you are a beginning user, you can just keep the default values here until you learn more about using global options.
- If you are an advanced user, you can save time by creating good default values here. When you set up menu items and create Products, you will be able to accept the default values for most options.
- All values set here can be overridden at the menu level.
Related Information
- To create and edit Products and Product categories: Product Manager
- For more information about Joomla's ACL system: ACL Tutorial
- Hits: 123593
